
ตั้ง Vite Admin Panel ให้ IoT Platform กัน!
Branch:
step-15-vite-setupPhase: Development (15/19) — Admin Console Repo: kangana1024/showkhun-workshop
เฮ้! น้องๆ มาแล้ว (ノ◕ヮ◕)ノ*:・゚✧
ถึงตอนนี้ backend ของเราพร้อมหมดแล้วครับ — device registry, sensor ingestion, MQTT, WebSocket hub, alerting engine ครบ แต่… ยังไม่มีหน้าให้คนใช้งานเลย จะให้ admin นั่งยิง curl ทุกวันก็คงไม่ไหว 555
นั่นแหละคือเหตุผลที่เราต้องสร้าง Admin Console!
คิดง่ายๆ ว่า Admin Console มันเหมือน ห้องควบคุมในโรงงาน — มีจอแสดงสถานะเครื่องทุกตัว, มีปุ่มให้กด, มีแจ้งเตือนเมื่อมีอะไรผิดปกติ แทนที่วิศวกรจะต้องวิ่งไปดูเครื่องทีละตัว
โพสต์นี้เราจะวาง foundation ของ console ทั้งหมด แล้วตอนถัดๆ ไปค่อยต่อยอดเป็น CRUD, monitoring, auth มาลุยกัน!
สิ่งที่น้องๆ จะได้กลับบ้าน
หลังจากอ่านจบ น้องๆ จะรู้จัก:
- ว่าทำไมถึงเลือก Vite + SPA แทน Next.js สำหรับ Admin Console (WHY ก่อนเลย!)
- ตั้งค่า Vite 8 + React 19 + TypeScript แบบ project references
- ใช้ Tailwind CSS v4 ผ่าน plugin (ไม่มี
tailwind.config.jsแล้วนะ!) พร้อม design tokens ใน CSS - เขียน fetch client เองที่มี timeout, error envelope และ “seam” สำหรับแปะ token
- จัดการ auth state ด้วย Zustand แบบเก็บ token ใน memory เท่านั้น
- ตั้ง React Router v7 พร้อม
ProtectedRoute+ role-based access - ดึงข้อมูลจริงจาก
/api/v1/devicesและ/api/v1/alert-rulesด้วย TanStack Query
ก่อนจะเริ่ม: ทำไมถึงเลือก Stack นี้?
เรามักถูกถามว่า “พี่ใช้ Vite เพราะอะไร ไม่ใช้ Next.js?”
คำตอบง่ายมาก — Admin Console ไม่ต้องการ SSR
Admin Console  →  ต้องการ SPA (Single Page Application)
                  - Login แล้วค้างหน้าไว้นาน
                  - Data update แบบ real-time (WebSocket)
                  - ไม่ต้องการ SEO (มันอยู่หลัง login)
                  - Users มีจำนวนน้อย แต่ใช้บ่อยมาก

Public Website →  ต้องการ SSR (Server Side Rendering)
                  - มี traffic สูง
                  - SEO สำคัญ
                  - First load ต้องเร็ว
Vite ใช้ native ES modules ทำให้ dev server เริ่มต้นเร็วมาก แถมพอ build จริงก็ tree-shake + code-split ให้อัตโนมัติ เหมือนเปิดไฟเทียบกับรอต้มน้ำ 555
เกร็ดสำคัญ: โค้ดจริงใน branch
step-15-vite-setupคือ Vite 8, React 19, react-router 7, Tailwind v4, TanStack Query v5 และ Zustand 5 — โพสต์นี้อ้างอิงตามเวอร์ชันจริงในโปรเจกต์ทั้งหมด ไม่ได้มโนเอา
ภาพรวม Architecture ก่อน Code
ก่อนลงมือ เรามาดูภาพรวมว่า pieces ต่างๆ มันต่อกันยังไง:
graph LR
    A[🖥️ Browser SPA] -->|/api/v1/*| B[⚡ Vite Dev Server]
    B -->|proxy + ws:true| C[🐹 Go Backend :3000]
    C --> D[(🍃 MongoDB)]
    C --> E[(📈 InfluxDB)]
    A -.->|wss /api/v1/ws| C
เห็นมั้ยครับว่ามันต่อกันยังไง? Vite dev server ทำหน้าที่ proxy request ที่ขึ้นต้นด้วย /api ไปให้ backend ที่ port 3000 — ทั้ง REST และ WebSocket (เพราะตั้ง ws: true) เราก็ไม่ต้องกังวลเรื่อง CORS เลยในช่วง development แถม host ของ backend ก็ไม่หลุดเข้าไปใน bundle ด้วย
Step 1: สร้างโปรเจกต์ + ติดตั้ง dependencies
# อยู่ที่ root ของ monorepo
npm create vite@latest frontend-admin -- --template react-ts

cd frontend-admin

# dependencies หลัก (เวอร์ชันตรงกับโปรเจกต์จริง)
npm install react-router@7 zustand @tanstack/react-query lucide-react

# Tailwind v4 มาเป็น Vite plugin แล้ว — ไม่ต้อง postcss/autoprefixer
npm install -D tailwindcss @tailwindcss/vite @types/node
สังเกตว่า ไม่มี axios, react-hook-form, zod, sonner ในขั้นนี้นะครับ — โพสต์นี้เรายังไม่ต้องใช้ เราจะเขียน fetch client เองให้เข้าใจกลไก แล้วค่อยเพิ่ม form library + validation ตอน CRUD ในโพสต์ถัดไป
Step 2: Vite Config — ตั้ง proxy ให้ backend
หัวใจของ dev experience อยู่ที่ vite.config.ts ตรงนี้แหละ มาดูทีละบรรทัด:
import { defineConfig } from 'vite'
import react from '@vitejs/plugin-react'
import tailwindcss from '@tailwindcss/vite'

// Vite dev server จะ proxy ทุก request ที่ขึ้นต้น /api ไปหา Go backend
// ทำให้ browser คุยกับ same-origin (เลี่ยง CORS) และไม่เอา host backend
// ไปฝังใน bundle ตอน dev
export default defineConfig({
  plugins: [react(), tailwindcss()],
  server: {
    port: 5174,
    proxy: {
      // REST + WebSocket ใช้ prefix /api/v1 ร่วมกัน
      // ws:true ทำให้ proxy upgrade connection สำหรับ /api/v1/ws ได้ด้วย
      '/api': {
        target: process.env.VITE_PROXY_TARGET ?? 'http://localhost:3000',
        changeOrigin: true,
        ws: true,
      },
    },
  },
})
เห็น tailwindcss() ใน plugins มั้ยครับ? นั่นคือวิธีของ Tailwind v4 — ไม่ต้องมี tailwind.config.js กับ postcss.config.js ให้รก เหมือนสมัยก่อนแล้ว ทุกอย่างมาอยู่ใน CSS แทน (เดี๋ยวเห็นใน Step ถัดไป)
WHY
ws: true? เพราะ monitoring ในโพสต์หน้าๆ จะ subscribe live sensor data ผ่าน WebSocket ถ้าไม่ upgrade proxy ตั้งแต่ตอน dev เดี๋ยวจะงงว่าทำไม real-time ไม่ทำงานในเครื่องตัวเอง
Step 3: TypeScript แบบ Project References
โปรเจกต์จริงไม่ได้ใช้ tsconfig.json ก้อนเดียว แต่แยกเป็น project references — ไฟล์ root ชี้ไปหา 2 config ย่อย (app กับ node) เพราะ code ที่รันในเบราว์เซอร์กับ code ที่รันใน Node (เช่น vite.config.ts) มันคนละ environment กัน
tsconfig.json (ตัว root เป็นแค่ตัวชี้):
{
  "files": [],
  "references": [
    { "path": "./tsconfig.app.json" },
    { "path": "./tsconfig.node.json" }
  ]
}
tsconfig.app.json (config ของ code ฝั่ง browser) — เปิด strict เต็มสูบ:
{
  "compilerOptions": {
    "target": "ES2022",
    "lib": ["ES2023", "DOM", "DOM.Iterable"],
    "module": "ESNext",
    "moduleResolution": "bundler",
    "verbatimModuleSyntax": true,
    "noEmit": true,
    "jsx": "react-jsx",

    "strict": true,
    "noUnusedLocals": true,
    "noUnusedParameters": true,
    "noFallthroughCasesInSwitch": true,
    "noUncheckedSideEffectImports": true
  },
  "include": ["src"]
}
ทำไมเปิด strict ขนาดนี้? เพราะ Admin Console มันคุยกับ backend ที่เป็น Go ซึ่ง type-safe สุดๆ ถ้าฝั่ง frontend หละหลวม เดี๋ยวจะมี bug ประเภท “field หาย แต่ไม่มีใครรู้จน production” เราเลยให้ TypeScript เป็น “ยามด่านแรก” ตั้งแต่ตอนเขียน
verbatimModuleSyntax: true คือตัวที่บังคับให้ import type ต้องเขียน import type { ... } ชัดเจน — อ่านโค้ดแล้วรู้เลยว่าอันไหนคือ type อันไหนคือ value
Step 4: Tailwind v4 + Design Tokens ใน CSS
นี่คือจุดที่เปลี่ยนไปเยอะที่สุดจาก Tailwind v3 — theme ทั้งหมดอยู่ใน CSS ผ่าน @theme ไม่ใช่ใน JS config อีกต่อไป
ทำไมต้องนิยาม token เอง?
แทนที่จะใช้ bg-blue-600 กระจายทั่ว app เรานิยามชื่อเชิงความหมาย เช่น surface, brand, critical ไว้ที่เดียว ถ้าวันนึงผู้บริหารบอกว่า “เปลี่ยนสีหลัก” เราแก้ใน @theme ที่เดียวจบ ทั้ง console ก็เปลี่ยนสีตาม
src/index.css:
@import 'tailwindcss';

/* Dark mode คุมด้วย class `dark` บน <html> (ตั้งใน index.html)
   custom variant ทำให้ utility dark: ตอบสนองต่อ class นั้น */
@custom-variant dark (&:where(.dark, .dark *));

/* Design tokens — Tailwind v4 อ่านตัวแปร @theme พวกนี้ไปสร้าง utility class
   ให้อัตโนมัติ (เช่น bg-surface, text-muted) แก้พาเลตที่เดียว เปลี่ยนทั้ง console */
@theme {
  --color-canvas: #0b0f17;
  --color-surface: #131a26;
  --color-surface-raised: #1b2433;
  --color-border: #26303f;
  --color-muted: #8b97a8;
  --color-foreground: #e6ebf2;

  --color-brand: #2dd4bf;
  --color-brand-strong: #14b8a6;

  --color-info: #38bdf8;
  --color-success: #34d399;
  --color-warning: #fbbf24;
  --color-critical: #f87171;
}

body {
  margin: 0;
  background-color: var(--color-canvas);
  color: var(--color-foreground);
}
console เป็นธีมมืดเป็นค่า default (เพราะ <html class="dark"> ใน index.html) ดูสบายตาเวลานั่งจ้องนานๆ ในห้อง control room
Step 5: โครงสร้าง Directory — บ้านของ Code
ก่อนเขียน code จริง เรามาออกแบบ “บ้าน” กันก่อน โครงสร้างจริงในโปรเจกต์เป็นแบบ feature-based ผสมกับ shared building blocks:
frontend-admin/
├── index.html
├── vite.config.ts
├── tsconfig.json
└── src/
    ├── main.tsx
    ├── App.tsx
    ├── index.css
    ├── api/                  ← ชั้นคุยกับ backend
    │   ├── config.ts         ← base URL, prefix, websocket URL
    │   ├── client.ts         ← fetch wrapper + ApiError + token seam
    │   ├── endpoints.ts      ← typed client (listDevices, ...)
    │   └── types.ts          ← domain types ตรงกับ Go structs
    ├── auth/
    │   └── session.ts        ← bootstrap session (เปลี่ยนใหญ่ใน step-18)
    ├── stores/
    │   └── auth.ts           ← Zustand auth store
    ├── providers/
    │   └── QueryProvider.tsx ← TanStack Query client
    ├── routes/
    │   ├── router.tsx        ← createBrowserRouter
    │   ├── ProtectedRoute.tsx
    │   └── nav.ts            ← เมนู sidebar
    ├── components/
    │   ├── layout/           ← AppLayout, PageHeader
    │   └── ui/               ← Badge, Button, Card, Spinner, StateBlock
    ├── features/
    │   ├── devices/queries.ts
    │   └── alertRules/queries.ts
    ├── lib/                  ← cn(), format helpers
    └── pages/                ← Login, Overview, Devices, AlertRules, ...
ของที่ “ใช้ซ้ำทุกหน้า” อยู่ใน components/ui ส่วนของที่ “ผูกกับ feature” (เช่น query ของ devices) อยู่ใน features/<feature>/ แยกชัดเจน หาของเจอเร็ว
Step 6: Domain Types — สัญญากับ Backend
ก่อนเขียน logic เราต้องมี “พิมพ์เขียว” ของข้อมูลก่อน จุดสำคัญคือ — field name ต้องตรงกับ json:"..." tag ของ Go struct เป๊ะ ไม่งั้น response จะ deserialize ผิด
Analogy: Types คือ “สัญญา” ระหว่าง frontend กับ backend ถ้าเขียนตรงกัน ทั้งสองฝั่งทำงานคู่ขนานได้โดยไม่ต้องรอกัน
src/api/types.ts (ตัวอย่างส่วน Device — สังเกต snake_case ตาม Go):
export type DeviceStatus = 'online' | 'offline' | 'error' | 'maintenance'

export type DeviceType =
  | 'temperature_humidity'
  | 'motion'
  | 'relay'
  | 'gateway'

export interface Device {
  id: string
  device_id: string
  name: string
  description?: string
  type: DeviceType
  status: DeviceStatus
  group_id?: string
  tags?: string[]
  enabled: boolean
  last_seen_at?: string
  created_at: string
  updated_at: string
}
และ envelope ที่ backend ห่อ response มาให้ (จาก backend/internal/httpx/response.go) — แยกระหว่าง object เดี่ยวกับ list:
// object เดี่ยว: { data: T }
export interface DataEnvelope<T> {
  data: T
}

// list มี pagination มาด้วย: { data: T[], pagination: {...} }
export interface ListEnvelope<T> {
  data: T[]
  pagination: Pagination
}

export interface Pagination {
  total: number
  limit: number
  offset: number
}
สังเกต pagination เป็นแบบ offset/limit (ไม่ใช่ page/totalPages) — เพราะ backend ใช้แบบนี้ ฝั่ง frontend เลยต้องตรงกัน
Step 7: Fetch Client — ยามที่คอย Guard ทุก Request
ทำไมเขียน fetch client เอง ไม่ใช้ axios?
เพราะของที่เราต้องการมันเฉพาะเจาะจง: timeout แบบ abortable, แปลง error envelope ของ backend เป็น ApiError ที่ branch ได้ (notFound / unauthorized), และ seam สำหรับแปะ token + จัดการ 401 โดยที่ตัว client เองไม่ต้อง import auth store ตรงๆ (เลี่ยง circular dependency)
มันเหมือน เจ้าหน้าที่รักษาความปลอดภัยที่ประตู — ทุก request ผ่านมือเขาก่อน เขาแปะ badge (token) ให้ และถ้า badge หมดอายุ (401) เขาก็มีโอกาสไป “ต่ออายุ” ให้ครั้งนึงก่อนจะปล่อยให้ fail
ก่อนอื่นนิยาม ApiError ที่พก HTTP status มาด้วย:
// ApiError พก status + message จาก error envelope ของ backend
// ให้ caller branch ได้ว่า 404 หรือ 401 และโชว์ validation รายฟิลด์ได้
export class ApiError extends Error {
  readonly status: number
  readonly fields?: Record<string, string>

  constructor(status: number, message: string, fields?: Record<string, string>) {
    super(message)
    this.name = 'ApiError'
    this.status = status
    this.fields = fields
  }

  get notFound(): boolean { return this.status === 404 }
  get unauthorized(): boolean { return this.status === 401 }
  get forbidden(): boolean { return this.status === 403 }
}
ต่อมาคือ “seam” — client ไม่รู้จัก auth store แต่ให้ store มา register callback ไว้แทน:
type TokenProvider = () => string | null
type Unauthorized = (() => Promise<string | null>) | null

let tokenProvider: TokenProvider = () => null
let onUnauthorized: Unauthorized = null

/** auth store จะเรียกอันนี้เพื่อบอก client ว่า "เอา token ปัจจุบันได้จากนี่นะ" */
export function setTokenProvider(provider: TokenProvider): void {
  tokenProvider = provider
}

/** handler ที่ client เรียกครั้งเดียวตอนเจอ 401 — อาจ refresh token เงียบๆ
 * แล้ว return token ใหม่เพื่อ retry หรือ return null เพื่อยอมแพ้ */
export function setUnauthorizedHandler(handler: Unauthorized): void {
  onUnauthorized = handler
}
แล้วฟังก์ชัน request ก็ห่อ fetch พร้อม timeout + retry-on-401 ครั้งเดียว:
export async function request<T>(
  path: string,
  opts: RequestOptions = {},
): Promise<T> {
  try {
    return await rawRequest<T>(path, opts, tokenProvider())
  } catch (err) {
    // เจอ 401 + ยังไม่ใช่ request anonymous + มี handler → ลอง refresh 1 ครั้ง
    if (
      err instanceof ApiError &&
      err.unauthorized &&
      !opts.anonymous &&
      onUnauthorized
    ) {
      const refreshed = await onUnauthorized()
      if (refreshed) {
        return rawRequest<T>(path, opts, refreshed) // retry ด้วย token ใหม่
      }
    }
    throw err
  }
}
ส่วน rawRequest ข้างในใช้ AbortController ตั้ง timeout, แปะ Authorization: Bearer <token> ถ้ามี, และอ่าน error envelope ออกมาเป็น ApiError — ในโพสต์นี้ onUnauthorized ยังแค่ clear session (ยังไม่มี refresh จริง) เดี๋ยว step-18 ค่อยเสียบ silent refresh เข้าไป โดยที่ทุก call site ไม่ต้องแก้อะไรเลย นี่แหละพลังของ seam
Step 8: Zustand Auth Store — เก็บ token ใน memory เท่านั้น
ทำไม Zustand แทน Redux?
Redux ดีครับ แต่ verbose มากสำหรับงานขนาดนี้ Zustand เหมือน ลิ้นชักเก็บของ — เปิดหยิบปิดเสร็จ ไม่ต้องมี action creator / reducer / middleware stack วุ่นวาย
แต่จุดที่สำคัญกว่าเรื่อง verbose คือ เรื่องความปลอดภัย — เราเก็บ access token ไว้ใน memory เท่านั้น ไม่ลง localStorage
src/stores/auth.ts:
import { create } from 'zustand'
import { setTokenProvider } from '../api/client'

export type Role = 'admin' | 'operator' | 'viewer'

export interface AuthUser {
  id: string
  email: string
  username: string
  role: Role
  display_name?: string
}

interface AuthState {
  // access token อยู่ใน memory เท่านั้น (ไม่ลง localStorage) เพื่อให้ payload XSS
  // ดูด credential อายุยาวจาก storage ไม่ได้
  accessToken: string | null
  user: AuthUser | null
  // true จนกว่า session bootstrap ครั้งแรกจะเสร็จ — ให้ router หยุดตัดสินใจไว้ก่อน
  // จะได้ไม่กระพริบหน้า login ให้คนที่ login อยู่แล้ว
  initializing: boolean

  setSession: (token: string, user: AuthUser) => void
  clearSession: () => void
  finishInit: () => void
}

export const useAuthStore = create<AuthState>((set) => ({
  accessToken: null,
  user: null,
  initializing: true,
  setSession: (token, user) => set({ accessToken: token, user }),
  clearSession: () => set({ accessToken: null, user: null }),
  finishInit: () => set({ initializing: false }),
}))
WHY ไม่เก็บ token ลง localStorage? เพราะถ้าโดน XSS แฮกเกอร์อ่าน localStorage ได้หมด ก็ขโมย token อายุยาวไปได้เลย การเก็บ access token (อายุสั้น) ใน memory แล้ว refresh ทีหลัง ปลอดภัยกว่ามาก — refresh แล้วหาย ก็แค่ login ใหม่ ไม่ได้ทำให้ใช้งานยากขึ้นเท่าไหร่
ที่ฉลาดคือ store เป็นคนไป “เสียบสาย” token เข้า client เอง — และนิยาม RBAC helper ไว้ที่นี่ด้วย:
// ลำดับ role สำหรับเช็คแบบ "อย่างน้อย" (operator ครอบ viewer, admin ครอบ operator)
const ROLE_RANK: Record<Role, number> = { viewer: 1, operator: 2, admin: 3 }

export function roleAtLeast(role: Role | null, required: Role): boolean {
  if (!role) return false
  return ROLE_RANK[role] >= ROLE_RANK[required]
}

// เสียบ token ใน memory เข้า API client — client เรียก getToken() ทุก request
// เลยเห็นค่าล่าสุดเสมอ โดยไม่ต้อง register ใหม่
setTokenProvider(() => useAuthStore.getState().accessToken)
หมายเหตุ: ในโพสต์นี้ backend ยังไม่มี auth จริง (มาในโพสต์ step-18)
auth/session.tsเลยทำเป็น “demo session” ให้เลือก role ไว้ explore console ก่อน แต่ทั้ง app พึ่งพาแค่ auth store ไม่ได้พึ่ง session module ตรงๆ ดังนั้นพอ step-18 มาเปลี่ยน session.ts เป็น login จริง ส่วนที่เหลือแทบไม่ต้องแตะเลย
Step 9: React Router v7 + Protected Routes
ทำไมต้องมี Protected Routes?
ลองนึกภาพถ้าไม่มี — ใครก็พิมพ์ /users เข้ามาได้เลย เหมือนสร้างตึกออฟฟิศแต่ไม่มีประตู ใครก็เดินเข้าได้หมด 555
ProtectedRoute ทำหน้าที่เช็ค 2 อย่าง: (1) login แล้วหรือยัง ถ้ายัง → ส่งไป /login, (2) ถ้ากำหนด minRole ไว้ → role ถึงเกณฑ์ไหม ไม่ถึงก็ส่งไป /forbidden
src/routes/ProtectedRoute.tsx:
import type { ReactNode } from 'react'
import { Navigate, useLocation } from 'react-router'
import {
  useAuthStore,
  selectIsAuthenticated,
  roleAtLeast,
  type Role,
} from '../stores/auth'
import { LoadingState } from '../components/ui/StateBlock'

export function ProtectedRoute({
  children,
  minRole,
}: {
  children: ReactNode
  minRole?: Role
}) {
  const initializing = useAuthStore((s) => s.initializing)
  const authenticated = useAuthStore(selectIsAuthenticated)
  const role = useAuthStore((s) => s.user?.role ?? null)
  const location = useLocation()

  // ยัง bootstrap ไม่เสร็จ → โชว์ spinner ไม่ให้หน้า login กระพริบ
  if (initializing) {
    return <LoadingState label="Restoring session…" />
  }
  // ยังไม่ login → ไป login พร้อมจำว่าจะไปไหน เพื่อเด้งกลับมาทีหลัง
  if (!authenticated) {
    return <Navigate to="/login" replace state={{ from: location.pathname }} />
  }
  // role ไม่ถึง → ห้ามเข้า
  if (minRole && !roleAtLeast(role, minRole)) {
    return <Navigate to="/forbidden" replace />
  }
  return <>{children}</>
}
สังเกต import จาก
react-router(ไม่ใช่react-router-dom) — ตั้งแต่ v7 เป็นต้นมา package รวมเป็นตัวเดียว ใช้react-routerตรงๆ ได้เลย
router หลักใช้ createBrowserRouter วาง layout protected ครอบหน้าทั้งหมด แล้วหน้า /users ห่อ ProtectedRoute อีกชั้นด้วย minRole="admin":
import { createBrowserRouter, Navigate } from 'react-router'

export const router = createBrowserRouter([
  { path: '/login', element: <LoginPage /> },
  { path: '/forbidden', element: <ForbiddenPage /> },
  {
    path: '/',
    element: (
      <ProtectedRoute>
        <AppLayout />
      </ProtectedRoute>
    ),
    children: [
      { index: true, element: <OverviewPage /> },
      { path: 'devices', element: <DevicesPage /> },
      { path: 'alert-rules', element: <AlertRulesPage /> },
      { path: 'monitoring', element: <MonitoringPage /> },
      {
        path: 'users',
        element: (
          <ProtectedRoute minRole="admin">
            <UsersPage />
          </ProtectedRoute>
        ),
      },
      { path: '*', element: <NotFoundPage /> },
    ],
  },
  { path: '*', element: <Navigate to="/" replace /> },
])
กฎเหล็ก: route guard ฝั่ง frontend คือ “ความสะดวก” ไม่ใช่ “ความปลอดภัย” จริง — backend ยังต้องเช็ค RBAC ของมันเองทุก request (เดี๋ยวเห็นในโพสต์ step-18) ฝั่ง client guard ไว้แค่ไม่ให้คนเห็นหน้าที่ตัวเองเข้าไม่ได้
Step 10: ดึงข้อมูลจริงด้วย TanStack Query
แทนที่จะ manage loading / error state เองในทุกหน้า เราใช้ TanStack Query จัดการ server state ให้ — cache, refetch, retry อัตโนมัติ
ตั้งค่า client ที่ QueryProvider ด้วย default ที่เหมาะกับ dashboard: stale time สั้น, ไม่ refetch รัวตอน focus, และ ไม่ retry error 4xx (auth/validation):
function makeClient(): QueryClient {
  return new QueryClient({
    defaultOptions: {
      queries: {
        staleTime: 15_000,
        refetchOnWindowFocus: false,
        retry: (failureCount, error) => {
          if (error instanceof ApiError) {
            // อย่า retry client error (auth, not-found, validation)
            if (error.status >= 400 && error.status < 500) return false
          }
          return failureCount < 2
        },
      },
      mutations: { retry: false },
    },
  })
}
แต่ละ feature มี query hook ของตัวเอง พร้อม query keys ที่ structure ชัดเจน (สำคัญมากตอน invalidate cache ทีหลัง):
// src/features/devices/queries.ts
export const deviceKeys = {
  all: ['devices'] as const,
  list: (params: ListDevicesParams) => ['devices', 'list', params] as const,
  detail: (id: string) => ['devices', 'detail', id] as const,
}

export function useDevicesQuery(params: ListDevicesParams = {}) {
  return useQuery({
    queryKey: deviceKeys.list(params),
    queryFn: ({ signal }) => api.listDevices(params, signal),
  })
}
เกร็ดเด็ด: สังเกต
queryFn: ({ signal }) => ...— TanStack Query ส่งAbortSignalมาให้ เราส่งต่อเข้า fetch client เลย พอ component unmount หรือ query ถูกแทนที่ request เก่าก็ถูก abort อัตโนมัติ ไม่มี race condition
หน้า Overview ก็แค่ยิง query แล้วเอา pagination.total มาโชว์เป็นการ์ดสรุป — เคล็ดลับคือ query ที่นับจำนวนใช้ limit: 1 พอ เพราะ total มาจาก pagination metadata อยู่แล้ว ไม่ต้องดึงทั้งหน้า:
const devicesQ = useDevicesQuery({ limit: 100 })
const onlineQ = useDevicesQuery({ status: 'online', limit: 1 })
const rulesQ = useAlertRulesQuery({ limit: 1 })
const enabledRulesQ = useAlertRulesQuery({ enabled: true, limit: 1 })
// แล้วเอา devicesQ.data?.pagination.total ฯลฯ มาวางในการ์ด
Step 11: ประกอบทุกอย่างใน App Entry
src/App.tsx ร้อยทุกอย่างเข้าด้วยกัน — จุดน่าสนใจคือเรา bootstrapSession() ก่อน render ครั้งแรก (synchronous + idempotent) เพื่อให้ router เห็น auth state จริงตั้งแต่แรก ไม่กระพริบหน้า login:
import { RouterProvider } from 'react-router'
import { QueryProvider } from './providers/QueryProvider'
import { router } from './routes/router'
import { bootstrapSession } from './auth/session'

// restore session ที่เก็บไว้ก่อน render แรก
bootstrapSession()

export function App() {
  return (
    <QueryProvider>
      <RouterProvider router={router} />
    </QueryProvider>
  )
}
Step 12: Environment Variables
.env.example จริงในโปรเจกต์ — สั้นกว่าที่คิด เพราะ dev ใช้ proxy เป็นหลัก:
# Base URL ของ backend (REST + WebSocket ใช้ host เดียวกัน)
# ปล่อยว่างไว้เพื่อใช้ Vite dev proxy (แนะนำตอน dev local):
# request จะวิ่งไป same-origin ใต้ /api/v1 แล้ว Vite forward ไป backend
# ตั้งค่าเฉพาะตอน build ที่จะคุยกับ remote backend ตรงๆ ห้าม commit URL จริง
VITE_API_BASE_URL=

# target ที่ dev-server proxy จะ forward ไป (ใช้แค่ตอนรัน vite ใน dev)
VITE_PROXY_TARGET=http://localhost:3000
Note: ใน Vite ตัวแปรต้องขึ้นต้น
VITE_เท่านั้นถึงจะ expose ให้ client-side ได้ — ตัวที่ไม่ขึ้นVITE_จะไม่ถูก bundle เข้าไป เป็น security feature ที่ดีมาก เราเลยไม่ฝัง host จริงไว้ใน bundle เด็ดขาด
สรุป — เราทำอะไรไปบ้างวันนี้?
(✿◡‿◡) สิ่งที่น้องๆ ได้กลับบ้านวันนี้| Component | Technology (เวอร์ชันจริง) | หน้าที่ |
|---|---|---|
| Build Tool | Vite 8 | Fast dev server, HMR, proxy /api → backend |
| UI Framework | React 19 + TypeScript 5.9 | Component-based UI, strict types |
| Styling | Tailwind CSS v4 (@theme ใน CSS) |
Design tokens, dark mode |
| Routing | React Router v7 | createBrowserRouter + ProtectedRoute |
| Server state | TanStack Query v5 | cache + AbortSignal + no-retry-4xx |
| Client state | Zustand 5 | auth token ใน memory + roleAtLeast() |
| HTTP | fetch client เอง | timeout, ApiError, token seam |
Key Concepts ที่สำคัญ
- Token seam — client ไม่ import auth store ตรงๆ แต่ให้ store register callback แทน เลี่ยง circular dependency และเตรียมที่ไว้เสียบ silent refresh ใน step-18
- Token ใน memory — access token ไม่ลง localStorage เพื่อกัน XSS ดูด credential
- Field name ตรง Go struct —
snake_caseตามjson:"..."tag, pagination เป็น offset/limit - Protected Routes = ความสะดวก ส่วนความปลอดภัยจริงอยู่ที่ backend RBAC
หน้าตาจริงเป็นยังไง?
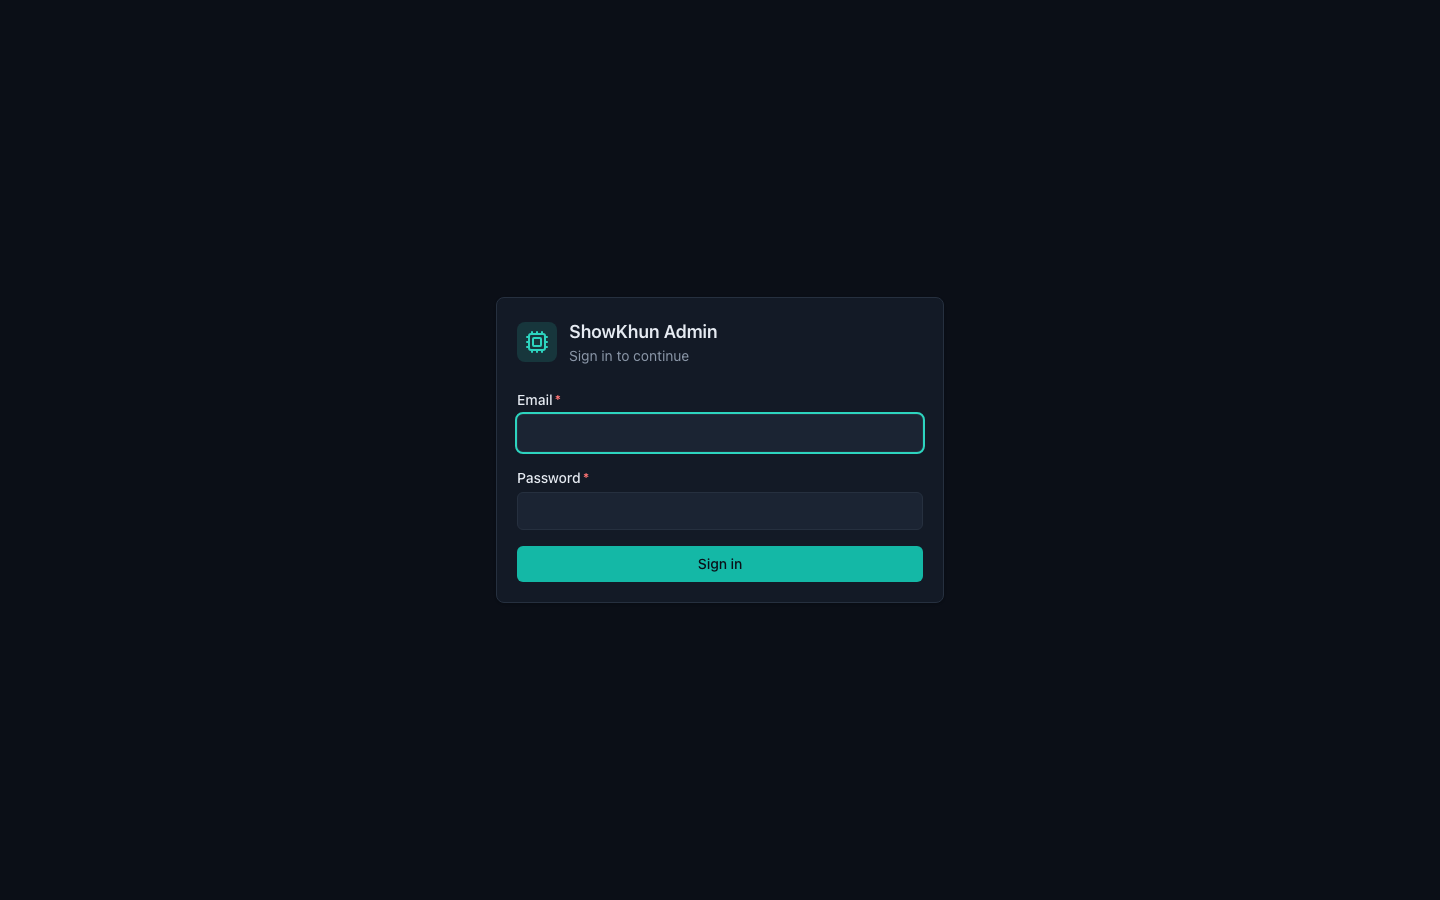
พอวาง foundation เสร็จ รัน npm run dev (port 5174) แล้วเปิดเบราว์เซอร์มาดู หน้าแรกที่เจอคือหน้า Login นี่แหละ — เรียบ สะอาด ธีมมืด ในโพสต์นี้ยังเป็น “demo sign-in” ให้เลือก role ก่อน (backend ได้ auth จริงในโพสต์ step-18) รูปนี้พี่ถ่ายจาก E2E test ที่รันจริงด้วย Playwright นะ ไม่ได้ตัดต่อ:
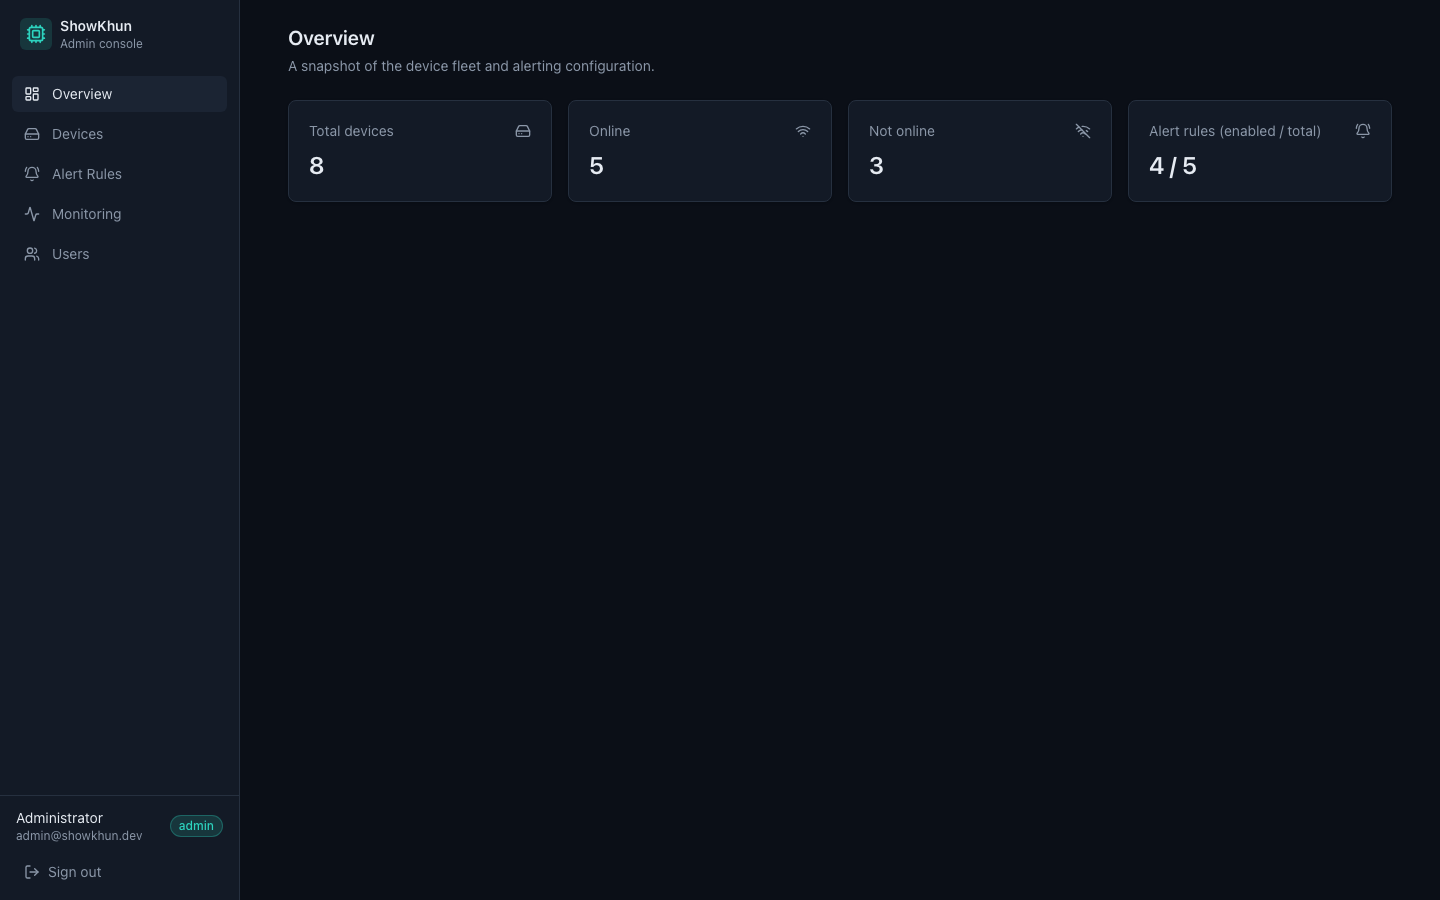
พอ login ผ่านปุ๊บ ก็เด้งเข้าหน้า Overview ที่มี Sidebar (AppLayout) ทางซ้ายแสดงเมนูครบ Overview / Devices / Alert Rules / Monitoring / Users พร้อมการ์ดสรุปที่ดึง pagination.total จาก /api/v1/devices และ /api/v1/alert-rules จริงๆ — นี่คือโครงที่เราจะต่อยอดไปเรื่อยๆ ใน workshop ถัดๆ ไป:
Next Step
Workshop นี้เราวาง foundation ทุกอย่างพร้อมแล้ว! ขั้นต่อไปคือมาสร้าง CRUD operations จริงๆ สำหรับจัดการ devices และ alert rules — มี DataTable แบบ reusable (sort/filter/select/paginate), modal form ที่ validate ด้วย React Hook Form + Zod, toast และ confirm dialog
มาลุยกันต่อใน Workshop ถัดไปได้เลย!